Productionizing custom ML models using Google Cloud's Vertex AI
Context
The aim of this article is to showcase step-by-step how to productionize and serve a custom machine learning model using Google Cloud’s Vertex AI.
All the required code for this article is hosted on its GitHub repository. The directory structure is as following:
.
├── ping_endpoint.ipynb
├── predictor
│   ├── Dockerfile.ipynb
│   ├── bank_marketing__xgboost_v0__predictor.py
│   ├── example_payload.txt
│   └── requirements.txt
└── trainer
    ├── Dockerfile
    ├── bank_marketing__xgboost_v0__trainer.py
    └── requirements.txt
We will be going through each of these components in detail in the subsequent sections.
The dataset used to build this proof of concept is an open source dataset that is related with direct marketing campaigns (phone calls) of a Portuguese banking institution.
Dataset Source: Moro,S., Rita,P., and Cortez,P.. (2012). Bank Marketing. UCI Machine Learning Repository.
This dataset is licensed under a Creative Commons Attribution 4.0 International (CC BY 4.0) license.
Productionization Architecture
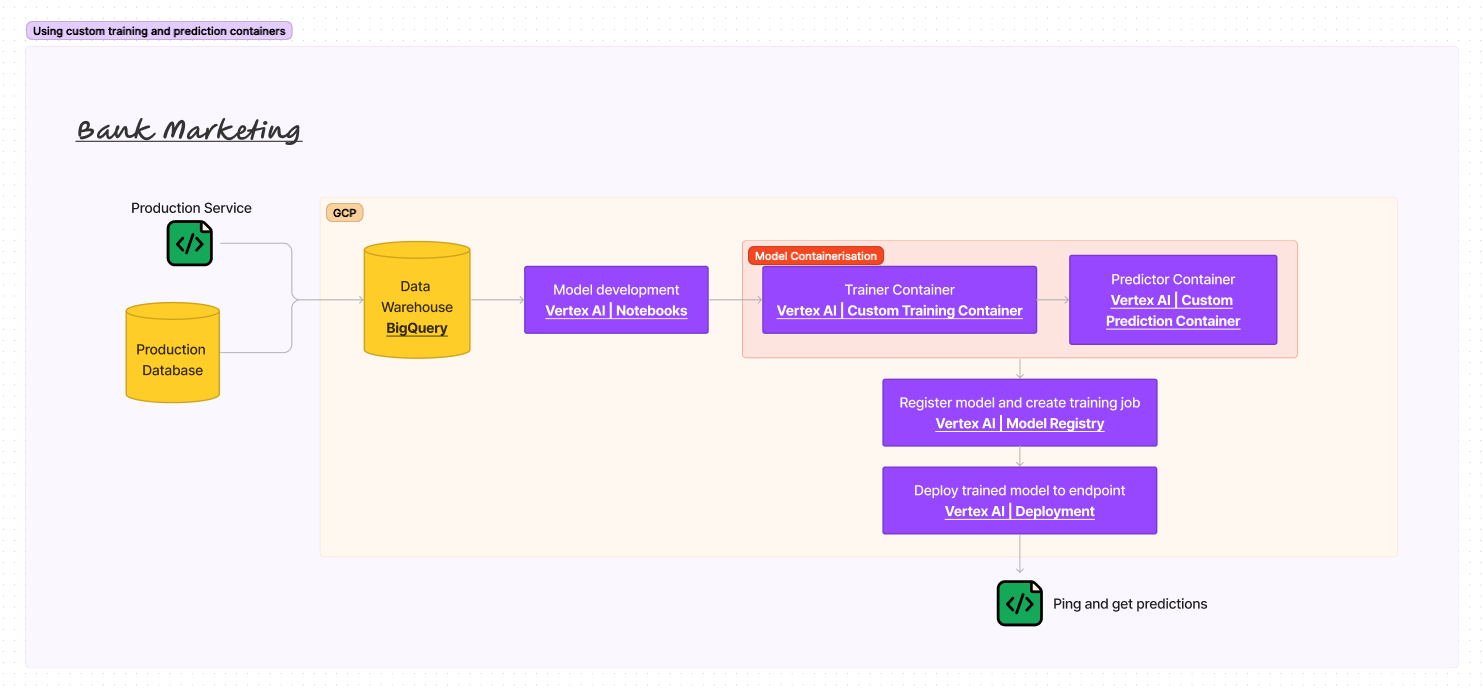
There are 5 key components of the above system design architecure:
- Data warehouse
- Data warehouses are now standard in most enterprises and are central repositories of integrated data from one or more disparate sources. In our system design, the data warehouse is BigQuery.
- Model development environment
- It is crucial for data scientists to have development environment with access to various suite of tools like Python or R programming environments, jupyter notebooks etc. in order to build models. Also, these development environments often have access to the data warehouse to ETL or ELT data from in order to develop models upon. In our system design, the development environment is the Vertex AI Notebooks.
- Model containerization
- Upon having developed a model, data scientists often containerize their model code(s) into Docker images. In our system design, we will have two docker containers i.e. one each for training and predicting. And the coding style that we will use will follow the requirements of Vertex AI’s custom training and prediction containers.
- Model registration
- Model artifact is the output file that results from saving a trained a model, and typically consists of trained parameters, a model definition that describes how to compute inferences, and other metadata. Model registration can essentially be considered as hosting and managing the trained model artifact at a location from where it can be used to serve predictions via an endpoint. In our system design, using the Docker containers of our model code, we will import our model to the Vertex AI Model Registry. From there we can create training jobs for our model amongst other things.
- Serving endpoint
- Serving endpoint essentially provides access to the trained model in order to obtain predictions. In our system design, we will use Vertex AI’s deployment guidelines to serve our trained model.
Steps to productionize and serve model using Vertex AI
This section assumes that you have access to the Google Cloud Platform (GCP) and already have a Google Cloud project. Here is a good guide on how to create a blank Google Cloud project.
1. Project setup
There just a few more steps to take care of before we can dive into the cool stuff:
- Create a Cloud Storage bucket (documentation). Note the name of the bucket that you choose as we will be needing it later.
- Create a repository on the Artifact Registry (documentation). This is where the Docker containers of our code will be stored. Note the name of the repository that you choose as we will be needing it later.
- To best simulate model productionization and serving at an actual enterprise, we will make sure that the training data is derived from a data warehouse. To do so, create a BigQuery dataset (documentation) and table from the open source dataset that we aforementioned. Note the name of the dataset and table that you choose as we will be needing them later.
- Finally, create a Vertex AI notebook instance (documentation). The notebook instance may take a couple of minutes to be ready. Once ready, click “OPEN JUPYTERLAB” to enter the development environment.
Now we have all necessary setup ready and the development environment also up and running!
2. Containerizing trainer code
trainer/bank_marketing__xgboost_v0__trainer.py is the crux file that essentially is the materialization of the developed model. It:
- Reads data from BigQuery
- Pre-processes the data
- Trains a XGBoost model
- Saves the trained XGBoost model onto a cloud bucket
Very classic. There are just two important aspects to follow which are required for the productionization and serving to work using Vertex AI:
- On the cloud bucket, the trained model artficat should be saved under a folder named “model”.
- It is recommended that in case of XGBoost, the trained model be savied using
xgboost.Booster’ssave_modelmethod to a file of type “json”.
After making sure that the Python code indeed performs the aforementioned 4 steps, it is time to create a Docker image of it. To do so, from within the trainer/ directory, first run the following commands:
export REGION=<your project region>
export PROJECT_ID=<your project id>
export REPO_NAME=<your image artifactory repository name>
export IMAGE_NAME=<name to give your trainer image>
export IMAGE_TAG=<tag to give your trainer image>
export IMAGE_URI={REGION}-docker.pkg.dev/${PROJECT_ID}/${REPO_NAME}/${IMAGE_NAME}:${IMAGE_TAG}

docker build -f Dockerfile -t ${IMAGE_URI} ./
Let’s verify the container image by running it as a container locally
docker run ${IMAGE_URI}
If the local run works, you can push the container to Artifact Registry.
docker push ${IMAGE_URI}
2. Containerizing prediction code
predictor/bank_marketing__xgboost_v0__predictor.py is the other crux file that essentially contains the piece of code that we want run behind the scenes when a request for prediction is made to our to-be-deployed endpoint.
As you notice, basically all that the predictor file contains is a single class that inherits the Predictor class from google.cloud.aiplatform.prediction.predictor. This is required in order to productionize and serve our custom model on Vertex AI. Furthermore, the class should contain the 5 functions with the same names as in the aforementioned predictor file:
__init__function for the class.loadfunction that loads our saved XGBoost model from the json file.preprocessfunction that does the same pre-processing on the data as done in the trainer code.predictfunction that calls the predict method of the loaded model with pre-processed data as the argument.postprocessfunction that essentially creates a response json using the predictions obtained from thepredictfunction.
Next, from inside the predictor/ directory, run the Dockerfile.ipynb python notebook that will essentially create and also push the predictor container to artifact registry.
3. Importing the model to model registry
With both the trainer as well as predictor container images in place, we can import the model to model registry. To do so, follow the steps described at the official Vertex AI documentation. Remember to select “import an existing custom container” for both training and prediction containers.
Upon doing this successfully, Vertex AI will import the model to the registry and will also start the training job.
4. Deplying the model
When the training job finishes, follow the steps described at official Vertex AI documentation to deploy a model to an endpoint. Deploying the model may take some minutes.
One final thing - we would also want to log the requests and the responses that we send to the endpoint. To do so, we need to enable request-response logging. This can be done by running the following commands:
export REGION=<your project region>
export PROJECT_ID=<your project id>
export ENDPOINT_ID=<the endpoint id>

curl -X PATCH -H "Authorization: Bearer $(gcloud auth print-access-token)" -H "Content-Type: application/json" "https://$REGION-aiplatform.googleapis.com/v1/projects/$PROJECT_ID/locations/$REGION/endpoints/$ENDPOINT_ID" -d '{"predict_request_response_logging_config": {"enabled": true,"sampling_rate": 1,"bigquery_destination": {"output_uri": "bq://<project id>.<bigquery dataset to store the logging>.<bigquery table name to store the logging>"}}}'
Important to note is that the BigQuery table passed for storing the logs should have the following schema:
| Field name | Type | Mode |
|---|---|---|
| endpoint | STRING | NULLABLE |
| deployed_model_id | STRING | NULLABLE |
| logging_time | TIMESTAMP | NULLABLE |
| request_id | NUMERIC | NULLABLE |
| request_payload | STRING | REPEATED |
| response_payload | STRING | REPEATED |
5. Pinging the deployment endpoint
Once the model is deployed, then note the endpoint id and run the ping_endpoint.ipynb python notebook to send a payload to the endpoint and receive predictions.
Conclusion
These are the key takeaways:
- We saw step-by-step how to productionize and serve a custom XGBoost model using Vertex AI. Now essentially, the XGBoost model can very much be considered a black box and the steps remain more or less exactly the same if one were to productionize and serve LightGBM or Tensorflow or any other model.
- Beautiful thing is that the documented components and steps to productionize and serve a model, can essentially be abstracted and the gist of them very much remains the same when:
- Working with other cloud providers.
- As well as working with enterprise native architecture if not the mainstream cloud providers. The core idea very much remains the same i.e. containerizing the trainer and predictor codes onto Docker images, saving the trained model onto a particular location and putting in place some framework (usually a web framework) to deploy the trained model to an endpoint.
Perhaps both of these could be separate articles in themselves. However, that’s all from me for now. Hope this was helpful!